In Narrative Studio, a Workspace is a dedicated environment where you can organize and manage your projects. Workspaces live within Organizations. Each workspace is isolated, allowing you to create narratives, define constructs, and collaborate with others without interfering with other workspaces. Follow these steps to create a new workspace and set up your environment.
Step 1: Access the Workspace Menu
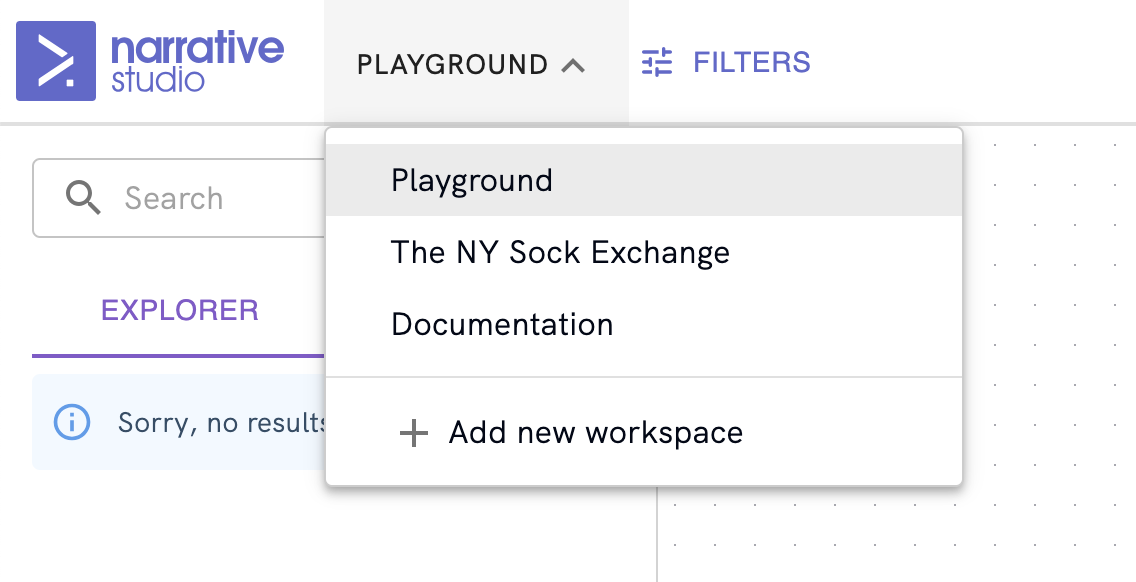
To create a new workspace, navigate to the Workspace Dropdown located at the top-left corner of the interface. By default, the dropdown will display the name of the current workspace.

Step 2: Open the Workspace Selection Menu
Click on the Workspace Dropdown. This will open a menu that lists your existing workspaces along with the option to Add a New Workspace.
Step 3: Select “Add New Workspace”
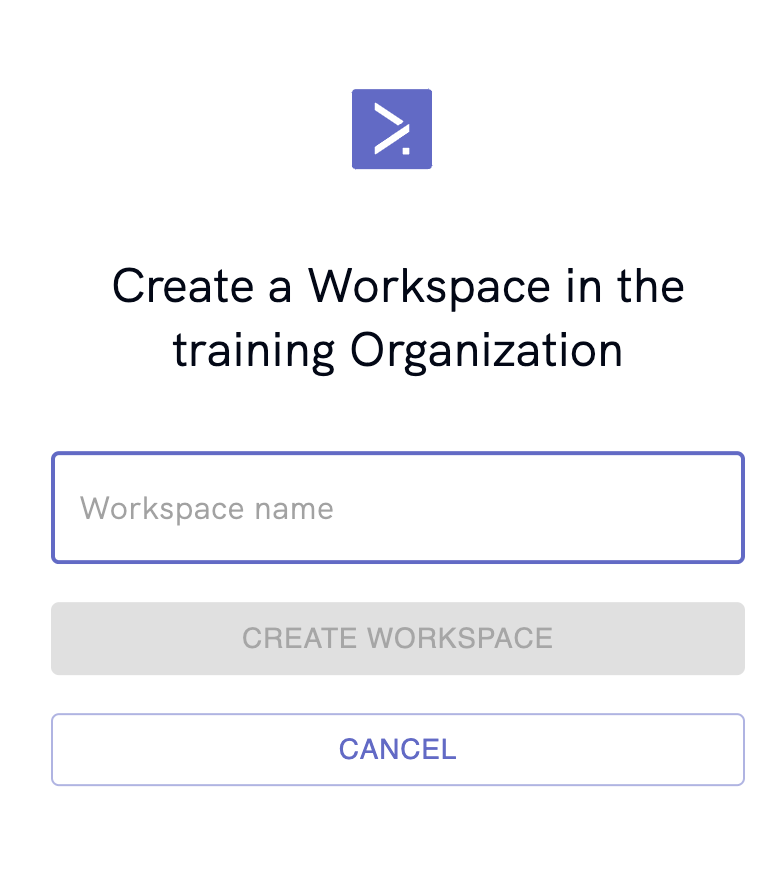
From the dropdown menu, click on “Add New Workspace.” This will open a dialog box where you can specify the details of the new workspace.
Step 4: Enter a Workspace Name
In the Create a Workspace dialog, you will see a field labeled “Workspace Name.” Enter a meaningful name that reflects the purpose of the workspace. For example, if you’re setting up a workspace for a specific project, use the project name like “E-commerce Redesign” or “Product Launch Plan.”

Step 5: Create the Workspace
Once you have named the workspace, click the Create Workspace button. Within a few seconds, the new workspace will be generated and displayed as the active workspace in your Narrative Studio.
Step 6: Verify the Workspace
After the workspace is created, you will see the workspace name at the top of the interface. You can now begin to build narratives, define constructs, and customize this workspace for your project.
Inviting Collaborators
Inviting collaborators to your workspace allows you to work with team members in real-time, share narratives, and collaborate on building detailed workflows and system designs. Here’s how to invite others to your newly created workspace.
Step 1: Access the Invite Users Dialog
Once inside the workspace, locate the Invite Users button on the top-right section of the interface, or in the “Others” section of the Settings menu. Click on the Invite Users button to open the Invite People dialog.

Step 2: Enter Email Addresses
In the Invite People dialog, you will see fields where you can enter the email addresses of the team members you want to invite. Add one email address per field. If you need to invite more than three collaborators, click on the + Add More button to add additional fields for more email addresses.

Step 3: Send Invitations
After entering the email addresses, click the Send Invitations button. The system will send an invitation email to each person, allowing them to join the workspace. If you are not ready to send the invitations yet, you can choose to Invite Later instead.
Step 4: Monitor Invitations
Once invitations are sent, you can monitor who has accepted and joined the workspace by viewing the Users tab of the Organization Settings. In this section, you can see all users who have completed the sign up process as well as their user roles (adjustable by admin users).
By following these steps, you can create a structured and collaborative workspace environment in Narrative Studio, making it easy for team members to contribute and stay in sync.
Want exclusive access to NDD content?
Become an NDD Pioneer. Sign up with your email to get access to new drops.